ASUS WL-500g custom firmware page
WARNING: DON'T TRY CUSTOM FIRMWARES UNLESS YOU KNOW WHAT YOU ARE DOING,
YOU COULD DESTROY YOUR UNIT BY DOING THIS! I'M NOT RESPONSIBLE TO ANY DAMAGE CAUSED
TO YOUR UNIT BY USING IT! USE ON YOUR OWN RISK!
This program is free software; you can redistribute it and/or
modify it under the terms of the GNU General Public License
as published by the Free Software Foundation; either version 2
of the License, or (at your option) any later version.
This program is distributed in the hope that it will be useful,
but WITHOUT ANY WARRANTY; without even the implied warranty of
MERCHANTABILITY or FITNESS FOR A PARTICULAR PURPOSE.
See the GNU General Public License for more details.
Link to the discussion forum at chupa.nl
Printing how-to is here
Download latest, Read the tips and tricks,
recompile everything yourself
ASUS 1.7.5.9 firmware
ASUS have not officially released 1.7.5.9 firmwares, but it has appeared at
here. Good news is that
starting with 1.7.5.7 ASUS guys started merging custom firmwares changes to their builds.
So, some of basic custom firmware features already there, but they does not provide
anything like ssh, telnet and raw printing. It's mostly bug fixes. There is no official
change log available at the moment, but some of changes includes
- Switched back pppoe to the binary used in the 1.6.5.3 - this is really annoying,
due to the fact that this increases firmware size
- There is a port speed setting line in the init scripts which is known to be a bad
thing - some routers just hangs
- Firmware seems to be incomplete - it contains provisions to support Telstra BigPond
in the web iface, but does not contain binaries
- There is some provisions probably for samba
- Numerous of fixes in the web cam www stuff
- Virtual servers are also accessible from the LAN side
Custom firmware 1.7.5.9-1 documentation draft 2004-06-14
Custom 1.7.5.9 based firmware
There is a new feature added in this firmware: it's now possible to completely
customize your boot scripts using the "local" pseudo file system. It's built
on top of ramfs and 64k flash space introduced in the 1.7.5.6 custom firmwares. The
idea is as follows: once you've made the changes to the ramfs system (/usr/local/
now also mapped to ramfs and it's strongly advised to put all your customizations in the
directories below this point), you need to launch special command to store modified files
permanently in the flash. During the next boot wl500g will extract these files for you.
So, you can store whatever you need just like in real non-volatile file system.
Consider using /usr/local/etc for files which is normally resides in /etc,
/usr/local/init for "ASUS style" init scripts and /usr/local/sbin
for executables files/scripts (it's now added to the default PATH).
Booting
- Once kernel is loaded, wl500g starts with /linuxrc boot script which is in fact
acts like initrd init. This script checks for boot_dev device specified in the nvram
for USB drive with root file system. If ext2 file system is recognized in the specified
USB drive and it contains /sbin/init and /initrd directory then linuxrc execs init from
this drive (just like linuxrc in initrds does). Otherwise flashed /sbin/init is being execed.
- /sbin/init launches and reads the /etc/inittab file. This file specifies /init/boot
as init script.
- /init/boot in turn performs the following:
- mounts procfs and ramfs and copies /ramfs to content to newely created ramfs
- compares boot_local nvram variable content with current version number (now stored
in the file named .version) and if they matches, then extracts
"local" pseudo file system from flash. This measure was taken to prevent
data prepared for one firmware to run after the firmware upgrade. You need to explicitly
enable boot_local in this case (see below).
- If /usr/local/init/pre-boot exists and is executable, then this file is
launched
- If /usr/local/init/functions exists and is executables, then this file is
launched, otherwise default startup script /init/functions script is launched just like
in stock ASUS firmwares
- Once startup is finished /usr/local/init/post-boot script is executed,
if it's executable
WARNING: Incorrect files could prevent your wl500g from booting. Double check
your changes before committing. If you wl500g failed to boot flash it with 1.7.5.6-5 firmware
(which does not utilize boot_local) and execute these commands:
nvram set boot_local
nvram commit
After that you can reflash your wl500g back to the latest firmware and boot normal
Saving your changes
Custom firmware contains script called flashfs (/sbin/flashfs). It's specially designed
for manipulating with persistent files. This script should be launched with one of the
following arguments:
Post 1.7.5.6 modifications
- /usr/local/init/post-firewall is now executed at the end of the default firewall script.
If you need any customizations place them here (this scripts also receives all the args passed
to the original firewall script, i.e. $1/$2 are WAN_IF/WAN_IP, $3/$4 are LAN_IF/LAN_IP, $5/$6 are
$DMZ_IF/$DMZ_IP
- /usr/local/etc/hosts is now copied by rc.dnsmasq script to the bottom of the /etc/hosts file (obsoletes nvram
etc_hosts)
- /usr/local/etc/ethers is now copied by rc.dnsmasq script to the bottom of the /etc/ethers file
- BUGFIX: bootCmd command ordering fix (thanks to yato)
- BUGFIX: launching dnsmasq with dhcp disabled fix
NVRAM stored command execution
Since 1.6.5.3-1 custom firmwares allows to execute any commands after the firmware initialization completed.
This functionality is now obsoleted by /usr/local/init/post-boot script, but is still available for backward
compatibility.
To use this do something like follows at the shell prompt after starting the telnet/ssh session:
Ssh and telnet daemons
Since 1.6.5.3-? custom firmwares contains telnet daemon enabled by default from the LAN side
of your router. Use login/password from the web interface to gain root access.
Also, there is a dropbear ssh daemon (password only auth, ssh v2) which is not enabled
by default. In order to use ssh you will need to perform this steps once:
- Connect to router using telnet
- Generate the DSS key using
/init/rc.sshd
- If generation was successfull you will need to add /init/rc.sshd to
bootCmds using something like
nvram set bootCmdX=/init/rc.sshd
- Commit the changes using
nvram commit
- Reboot the router using
reboot
or run /init/rc.sshd manually
Update: since 1.7.5.9-4 dropbear ssh daemon was recompiled with
support for both RSA and DSS keys, and public key autentication. Authorized keys are supposed
to be stored in the /usr/local/root/.ssh/authorized_keys (i.e. in the flashfs area).
Keys handling was also changed: it's no longer stored in the nvram, but in flashfs space
/usr/local/etc/dropbear/. Old dss key will be automatically converted to new native format
and RSA key will be generated once you execute /init/rc.sshd. You will then need to commit
changes to flashfs and start /init/rc.sshd again.
Root file system on external USB drive
Since 1.7.5.6-1 custom firmwares support booting with root fs on the external usb storage drive.
In order to make this thing to work you will need to
- Create and format an ext2 partition on the usb drive and copy the initial image for
the root fs (you can use the fs used in the current firmware available as separate download)
- Set the right boot device using
nvram set boot_dev="/dev/scsi/host0/bus0/target0/lun0/part1"
- Commit the changes using
nvram commit
After that wl500g on each reboot will try mounting the external device and if this succeeds boot
from it, otherwise it will using the flashed root fs. Once you've booted from external storage
you can remount your fs read-write using
mount -o remount,rw,noatime /dev/scsi/host0/bus0/target0/lun0/part1 /
(use noatime option to minimize the number of writes), make the changes and remount it read-only using
mount -o remount,ro /dev/scsi/host0/bus0/target0/lun0/part1 /
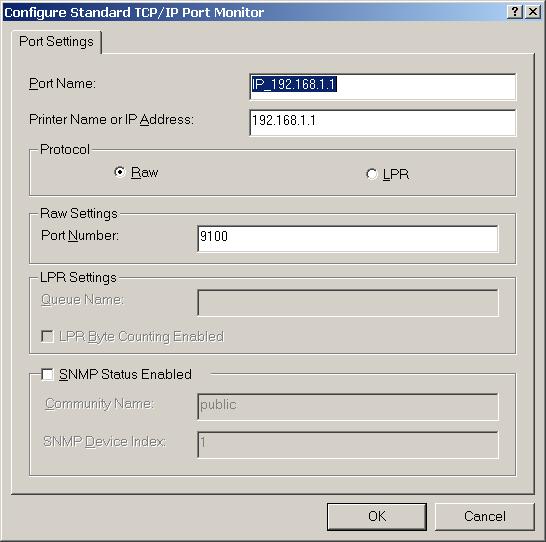
Raw printing
Since 1.7.5.6-2 ASUS supplied printing solution was replaced with
p910nd daemon which
implements Raw port printning with Socket API protocol (also known as HP JetDirect).
In order to use new printing facility from Windows you will need
to change the port seetings to use "Raw" protocol instead of "LPR" and specify
port number for the port. Use 9100 for printer connected to the LPT port or
9101 for USB connection. Please note, it's now possible to use two printers
at the same time. The port settings dialog should look like the following:
 Complete Windows 2000 printing how-to
is available here.
Complete Windows 2000 printing how-to
is available here.
For ones who is interesting why I've changed this: lpd implemented by ASUS
are in fact based on LPRng printing daemon and implements LPR protocol, which
is in fact need spooling directory. Asus guys has modified it a little so it
does not use spooling but resultant software is a big piece of glitches which
we can't fix due to number of reasons - unavailability of source code (yes,
Asus violating GPL) and the LPR protocol nature. JetDirect printing on the
other hand is support direct printing without need for spooling and provides
everything needed for remote host software to talk with printer. What it gives?
Higher printing speed, support for unlimited prining job size (with Asus solution
I'm unable to print any photo to my deskjet, and now it's possible) canceling
of the job and everything you ever need. ;-) Everything that was supported with
Asus LPR printing is supported with RAW protocol, may be it's supports even
more. ;-) Also there is a Linux
Router project page which has a list of successfully used printer in such
setup and has a link in how to setup different Windows versions. Personally
I'm using HP DeskJet 3420 printer which is now works like a charm. ;-)
Update: 1.7.5.9-3 firmware use both printing methods - LPR (used by ASUS) and RAW,
so you can use both protocols. Please note, LPR does not allow you to access second
printer, due to fixed queue name used by ASUS - "LPRServer".
Limited wireless client mode suport
Starting with 1.7.5.6-3 custom firmwares contains limited wireless client mode support. Things which does not work includes WPA, web interface configuration (changes made from web interface is now ignored) and MAC address cloning. Please note what client mode stuff are only partially tested. In the client mode physical WAN port and WLAN roles are exchanged (i.e. WAN port becomes either LAN or DMZ depending on your settings).
To activate client mode you should execute the following nvram commands:
# turn on sta mode (0 = ap, 1 = sta, 2 = wet)
nvram set 13_x_ClientMode=1
# If you need IBSS (Ad-hoc) mode add this also (0 = bss, 1 = ibss)
nvram set 13_x_IBSS=1
# commit settings
nvram commit
# reboot
reboot
Limited samba support
Since 1.7.5.6-5 Samba 1.9.17p5 is included but, not enabled by default.
Important notice: the samba is totally unsupported, use on your own risk!
Small how-to:
Once you've rebooted your wl500g should appear in workgroup called WORKGROUP and present you a share named "share".
This share is read-only view of your usb drive (/mnt/usbfs). There is also second invisible share called "share$"
which is in the fact the read/write view of /mnt/usbfs. No other access restriction present.
Please note, that samba requires valid /etc/hosts file to present in the file system, which is by default not available in
access point mode. In order to run samba in AP mode you should either prepare your own /etc/hosts file or launch /init/rc.dnsmasq.
There is also log files available for samba - /var/log/nmb and /var/log/smb
Starting with 1.7.5.9-4 there is a QoS support compiled into the kernel.
Wondershaper script is called /init/wshaper, and should be
started as follows (play with download & upload values to find optimal one, they should be something lesser
than your modem/isp speed).
/init/wshaper start
Preferred place for this is the post-firewall script. Mine line looks like this:
/init/wshaper start "$1" 1000 220
Other changes made to stock 1.7.5.9 firmware
- Support DHCP address allocation with PPTP service.
To activate DHCP set 0.0.0.0 as your
static address. This is really experimental and mostly a quick workaround. It's not handling lease state changes.
- Support CHAP authentication with PPTP service.
- Support for specifying the static address for the external interface in PPPoE mode.
Useful for management of the external ethernet modem.
- PPPoE relay could be used with any connection type.
- TKIP+AES mode support (thanks for Antiloop for discovering)
- Route ouput are no longer truncated to "known" interfaces
- Replaced dproxy & udhcpd with dnsmasq to support both static leases and
dhcp/dns integration (so you can resolve host names based on their dhcp
names)
- Updated pwc (Philips webcams) kernel module to 8.12 version
- Update ov511 kernel module to 1.65 version, support for ov518 cameras (compression)
- Fixed errors in the ASUS modified printer.o to resolve problems with kernel oopses
when printer is connected to the wl500g (thanks to ebakke for testing)
- Fixed DynDNS wildcard support - thanks for Death
- Replaced ntpclient with latest version & linked with uclibc, changed web interface
appropriately. You can now specify symbolic (domain) name for the NTP server. But please note,
what there is a feature/bug in the current firmware which is prevents pppoe/pptp
autoconnect when symbolic name used.
- Added an ability to change Administator name (based on files submited by Technik)
- Enabled log rotation, so your logs should not be bigger than 200K.
- Flashed rootfs is now squash fs (the resultant image is now smaller than official firmwares)
- Added access to 64k "config" partition in the flash (/dev/mtblock/4, /dev/mtd/4)
for storing anything you need (use mtdutil for write/erase)
- Added ether-wake utility for wake-on-lan functinality
- New timezone (Azores Islands)
- Changes in the ddns script to prevent abuse after reboot
- uClibc is now included fully, so there is no need to link external apps statically
- removed /init/firewall_change script completely
- fixed possible hang when booting with "auto" port speed setting
Customizing firewall
The simplest way to customize your firewall is to write the /usr/local/init/post-firewall script.
This script is executed right after the built-in firewall script finishes executing. For general
firewall questions please visit netfilter site.
If you've examined the filesystem right after the initial firmware installation you will notice
that /usr/local directory is empty. You will need to manually create both /usr/local/init
directory and then create /usr/local/init/post-firewall script. So, the sequence could be as
following (lines, starting with # are comments)
# create directory
mkdir -p /usr/local/init
# edit file using vi editor
vi /usr/local/init/post-firewall
# make this file executable (very important)
chmod +x /usr/local/init/post-firewall
After that you need to "activate" your changes. It's a good idea to test post-firewall
before committing changes. So, if your script does not expect any args, just type
/usr/local/init/post-firewall
Check output for errors. And verify that iptables state is something you've expected by typing
iptables -L -v
iptables -L -v -t nat
Once you've done you can proceed with committing changes like this
# prepare image
flashfs save
# commit it to flash once you've checked, that file size does not exceed 64k
flashfs commit
# if you have not enabled flashfs yet type this as well
flashfs enable
Reboot your router it should then use your file.
Here is the /usr/local/init/post-firewall sample (which I've used in my setup)
# delete the default rule for ftp server, which enables access from WAN
# I do not need this, cause I'm using ftp server from the LAN side only
# Note $1 - it's just a placeholder for wan iface name
iptables -D INPUT -i "$1" -p tcp --syn --dport 21 -j ACCEPT
# Allow access to ssh server from WAN
iptables -A INPUT -p tcp --syn --dport 22 -j ACCEPT
Migrating from bootCmds to post-boot and customizing post-boot
Migration is really simple at the moment. This could be done as follows
# create directory if it's not there
mkdir -p /usr/local/init
# copy bootCmds to your new post-boot script
cp /tmp/bootCmd /usr/local/init/post-boot
At this point you can edit /usr/local/init/post-boot using vi. Once done proceed with following
# prepare image
flashfs save
# commit it to flash once you've checked, that file size does not exceed 64k
flashfs commit
# if you have not enabled flashfs yet type this as well
flashfs enable
You will also need to delete your bootCmds. To check bootCmds name type command like this
nvram show|grep bootCmd
This should produce series of lines with your bootCmds. You need to reset them using commands
like this
# resets command named "bootCmd0"
nvram unset bootCmd0
# resets command named "bootCmd1"
nvram unset bootCmd1
# commit your changes
nvram commit
Here is the /usr/local/init/post-boot sample (which I've used in my setup)
# launch ssh daemon
/init/rc.sshd
# mount my second usb flash for samba
mount -t vfat -o rw,noatime /dev/scsi/host1/bus0/target0/lun0/part1 /mnt/usbfs/
# launch samba daemons
/usr/sbin/nmbd -D
/usr/sbin/smbd -D
# remount my rootfs if booted from the usb drive (fails otherwise)
mount -o remount,rw,noatime /dev/scsi/host0/bus0/target0/lun0/part1 /
Customizing samba config
That's very simple. If you need to change /etc/smb.conf only, then you just need
to add this file to /usr/local/.files using this command (this command should be
executed only once)
echo /etc/smb.conf >> /usr/local/.files
To list the files which is already in the list to be saved type this command
cat /usr/local/.files
Once you've finished editing /etc/smb.conf commit your changes using
# prepare image
flashfs save
# commit it to flash once you've checked, that file size does not exceed 64k
flashfs commit
# if you have not enabled flashfs yet type this as well
flashfs enable
Altering boot process
This is an advanced topic. You need to be absolutely sure what you are doing. So, the idea
is pretty simple - copy /init/functions script to /usr/local/init/ and do whatever you like with it.
In fact firmware checks for /usr/local/init/functions existence and launch it instead of
default /init/functions
The commands looks like this
# no comments - you should know what you're doing
mkdir -p /usr/local/init
cp /init/functions /usr/local/init/
vi /usr/local/init/functions
# flashfs
flashfs save
flashfs commit
flashfs enable
Completely altering boot process ;-)
This is even more advanced topic. The idea is to use kernel 2.4 mount bind option to replace the
/init with /usr/local/init. To do this you will probably need to utilize /usr/local/init/pre-boot
script. This will allow to do the things, which change some of the internal things, like a
firewall.refresh which is called by ASUS watchdog and the path is hardcoded. The initialization commands
should look like this
# you should know what you're doing
mkdir -p /usr/local/init
# copy the initial contents
cp /init/* /usr/local/init/
# setup bind trick
echo "mount -o bind /usr/local/init /init" > /usr/local/init/pre-boot
chmod +x /usr/local/init/pre-boot
# flashfs
flashfs save
flashfs commit
flashfs enable
Re-enabling flashfs load after the firmware upgrade
Once you've upgraded/downgraded your firmware you could notice, that /usr/local becomes empty
on boot. Don't worry, everything is here, but was not loaded to prevent errors. If you feel
it's ok to re-enable it, then just type the following
flashfs enable
to re-enable flashfs. After that you need to reboot for changes to take effect.
Recompiling 1.7.5.9-3 firmware
To recompile firmware you need to download GPL source code available at
ASUS site for firmware version 1.7.5.6 (GPL_1756.zip). You will when need
to unzip this & and untar the sources and then install toolchain according
to README files. Also you will need to download firmware sources from this page and untar
them somethere.
Compiling the kernel
You will need to prepare kernel sources for this. Download 2 patches:
et module patch adds "missing"
et module source code (ask ASUS guys about that) and the
second adds bunch of stuff from
custom firmware - squashfs, updated pwc an ov511 modules, fixes for usb
printing and something I can't even remember. To patch sources execute these
lines:
cd /path/to/WL500gb_1.7.5.6_GPL
gunzip -c path/to/wl500g-et-1.7.5.6.patch.gz \
    path/to/wl500g-kernel-1.7.5.9-3.patch.gz | patch -p 1
This should produce number of strings saying "patching file
bla-bla-bla" and no error messages. If you got errors then check
your kernel source tree. Once this was done you need to copy
kernel config file, which is named .config and located in the root
folder of the custom firmware sources and than rebuild kernel. E.g.
cd /path/to/WL500gb_1.7.5.6_GPL/release/src/linux/linux/
make mrproper
cp /path/to/wl500g-1.7.5.9-3/.config .
make oldconfig
make dep zImage modules
If you want to customize your kernel use menuconfig instead
of oldconfig. Again everything should be done with no errors.
At this point your kernel is compiled.
Compiling firmware
Install ASUS toolcahin, untar curstom firmware sources, e.g.
tar xjf wl500g-1.7.5.9-3.tar.bz2
This will create directory named wl500g-1.7.5.9-3. Go to this dir.
If you've recompiled kernel, when you need to copy fresh kernel image
and install modules using commands like this
cd wl500g-1.7.5.9-3
rm -rf extra/lib/modules/2.4.20
cp /path/to/WL500gb_1.7.5.6_GPL/release/src/linux/linux/arch/mips/brcm-boards/bcm947xx/compressed/vmlinuz piggy.gz
make -C /path/to/WL500gb_1.7.5.6_GPL/release/src/linux/linux modules_install \
    DEPMOD=/bin/true INSTALL_MOD_PATH=/path/to/wl500g-1.7.5.9-3/extra/
Once done just type make. This should start compiling. If everything is went
well it should produce file named linux.trx which is your new firmware.
To recompile firmware you need to download GPL source code available at
ASUS site for firmware version 1.7.5.6 (GPL_1756.zip). You will when need
to unzip this & and untar the sources and then install toolchain according
to README files. Also you will need to download custom
firmware sources from this page and untar
them to the WL500gb_1.7.5.6_GPL/release/src directory of ASUS firmware:
tar -C /path/to/WL500gb_1.7.5.6_GPL/release/src/ -xjf wl500g-1.7.5.9-4.tar.bz2
Compiling the kernel
You will need to prepare kernel sources for this. wl500g-1.7.5.9-4 contains 2 patches
in the kernel subdirectory: wl500g-et-1.7.5.6.patch.gz patch adds "missing"
et module source code (ask ASUS guys about that) and the wl500g-kernel-1.7.5.9-3.patch.gz
which adds bunch of stuff from custom firmware - squashfs, updated pwc an ov511 modules,
fixes for usb printing, QoS updates and something I can't even remember.
To patch sources execute these lines:
cd /path/to/WL500gb_1.7.5.6_GPL/release/src/wl500g-1.7.5.9-4
make -C ../linux/linux mrproper
gunzip -c kernel/*.patch.gz | patch -p1 -d ../linux/linux
This should produce number of strings saying "patching file
bla-bla-bla" and no error messages. If you got errors then check
your kernel source tree. Once this was done you need to rebuild kernel using
make linux
Everything should be done with no errors. At this point your kernel is compiled.
Compiling firmware
Compile kernel first and once done just type make.
This should start compiling. If everything is went
well it should produce file named linux.trx which is your new firmware.
Downloads
Download 1.7.5.9-1
No longer available for download. Use 1.7.5.9-2.
Download 1.7.5.9-2 (2004-06-19)
This is a bugfix release. Things fixed
- WebCam, Ftp, Samba server does not work in 1.7.5.9-1 due to several
incompatibilities between official/custom firmwares
- DNS proxy rejects queries after PPPoE/PPTP reconnection
- Custom firmware configuration for the WAN iface was not set in PPPoE mode
Downloads
Download 1.7.5.9-3 (2004-07-25)
This is an security fix update release. It's strongly recomended to update
to this latest firmware to fix security bug found in dropbear ssh daemon.
Things changed:
- LPR protocol printing support added back (so, ASUS printing stuff co-exists with RAW)
- Updated dnsmasq to 2.9
- Updated dropbear to 0.43
Downloads
Download 1.7.5.9-4 (2004-08-14)
Things changed:
- Added QoS (and wondershaper) support
- Added Telstra BigPond support (intergrated to the web) (credits to rwhitby)
- Recompiled dropbear ssh daemon for RSA/DSS support and pubkey authentication
- Updated squashfs to 2.0
- Source tree adjusted to rebuild kernel and it's dependencies
- Australian timezones patch (thanks to rwhitby)
- Workaround ASUS bug in dynamic dns code (wlanutil nslookup empty output)
No longer available for download - use 1.7.5.9-5 instead
This is a bug fix release. BigPond support was not functional in 1.7.5.9-4.
TODO list (incomplete)
- avoid using bootCmds entirely
- snmpd (requires some time to dig with options to build minimal app)
oleg